Editing Class Rules and Viewing Reports
This guide shows you how to adjust your trading rules and introduces you
to the detailed reports available on StockTrak to track student progress.
Editing Trading Rules
To edit a class rule, click Edit Portfolio Simulation Rules under Admin on the main menu.
If you would like to set-up a new class and need some assistance, please go to Setting Up Your Class Guide.
You can edit almost any parameter in your session, with the following exceptions:
- Portfolio currency cannot be changed.
- Initial cash balance – contact our helpdesk.
- Trading end date – contact our helpdesk.
- Margin trading – contact our helpdesk.
Click the Edit Budget Game button to edit any of the settings within the Budget Game.
By default, you will be taken to the Edit Portfolio Simulation page, where you can add/remove securities and exchanges at any time, along with editing most trading settings.

Contacting Helpdesk
Contact our Helpdesk if you want to update:
- Initial Cash
- Trading End Date
- Allow/Disallow Margin Trading

While logged in, you can click the chat icon in the bottom right corner to reach the StockTrak Support team.
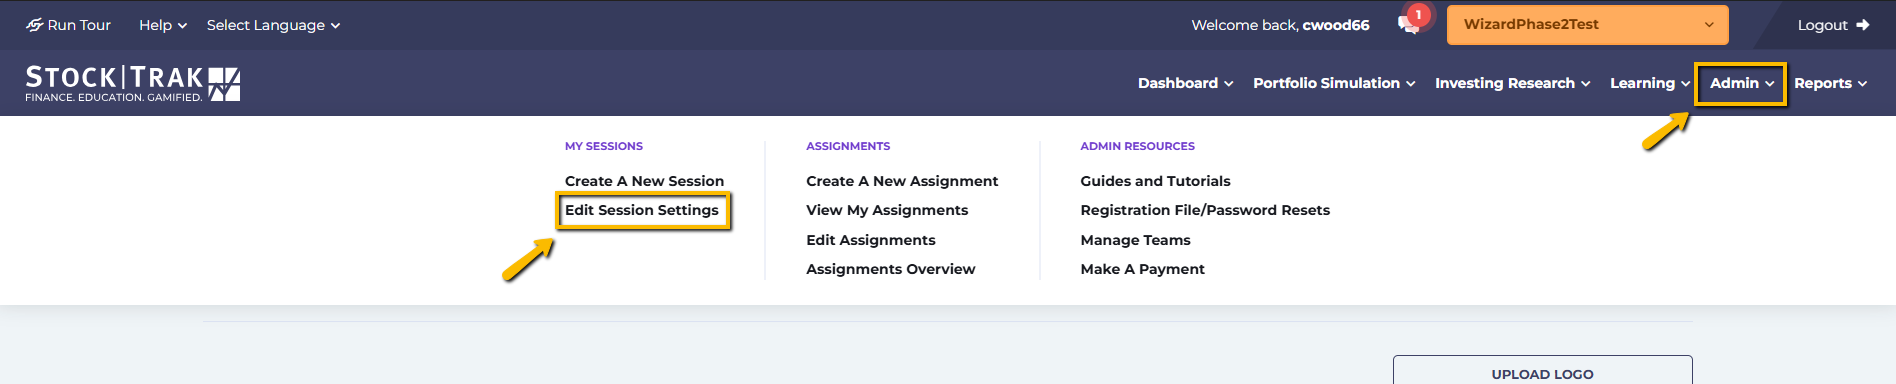
Admin Menu
Under the admin menu is where you can:
- Create or edit your sessions
- Create, edit or view your assignments
- Access tutorials and how-to guides
- Registration file – reset passwords and portfolios, or grant special TA permissions
- Manage Teams (more info below)
- Make a payment

Manage Teams
How Teams Work
When you create a team the individual student portfolios are averaged together in the class rankings.
You can elect to have one student place all trades, while the other team members login to their accounts to advise them. Otherwise, all the trades placed in each student account will be averaged together in the team portfolio.
Team Account Login Details
The team account login exists to allow team members to login and view their combined portfolio, however they cannot place trades from that account.
Students should use their individual accounts for the Budget Game and to complete any/all assignments.
You will need to use the team name and password to view team holdings.
- Once you’re on the Manage Teams page, you should see two columns: Users Without Teams and Active Teams. Make sure to check the session name (in the orange button) in the top menu is the right one before proceeding.
- If you haven’t already created any teams, you can do so by clicking + Add New Team. Please keep in mind that like usernames, the system will not allow duplicate names for teams.
- To add a student to a team, select the team name from the Add To Team dropdown menu next to their name.
- You can view students already in a team by clicking on View Team.
- If you want to remove a team, you can click DELETE, and the students in that team should reappear in the Users Without Teams column. If they don’t appear right away, you can refresh your page.

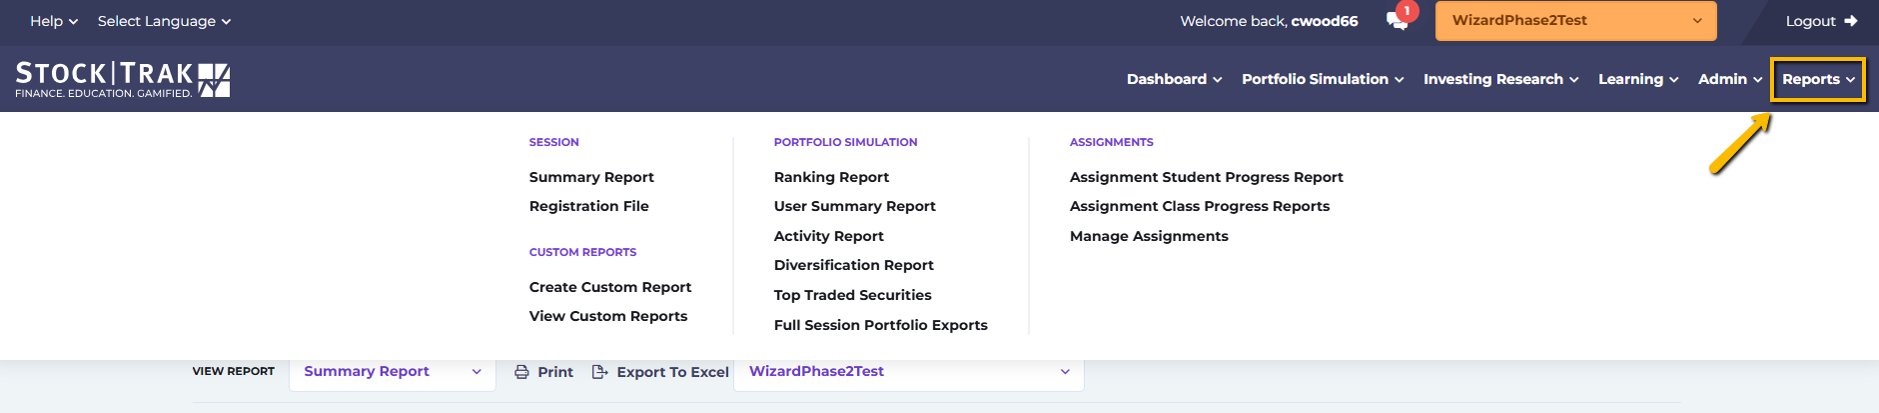
Reports Menu
The reports menu is where you can access both the premade and custom reports for your class or session. If you have more than one active session, click the orange button in the top menu to choose the right one before viewing your reports.
Summary Report
The summary report has some overview information for your session; such as total registrations, total activations (a student account which has placed at least one trade), and the total number of trades placed so far. You can also review which security types and exchanges have been enabled.
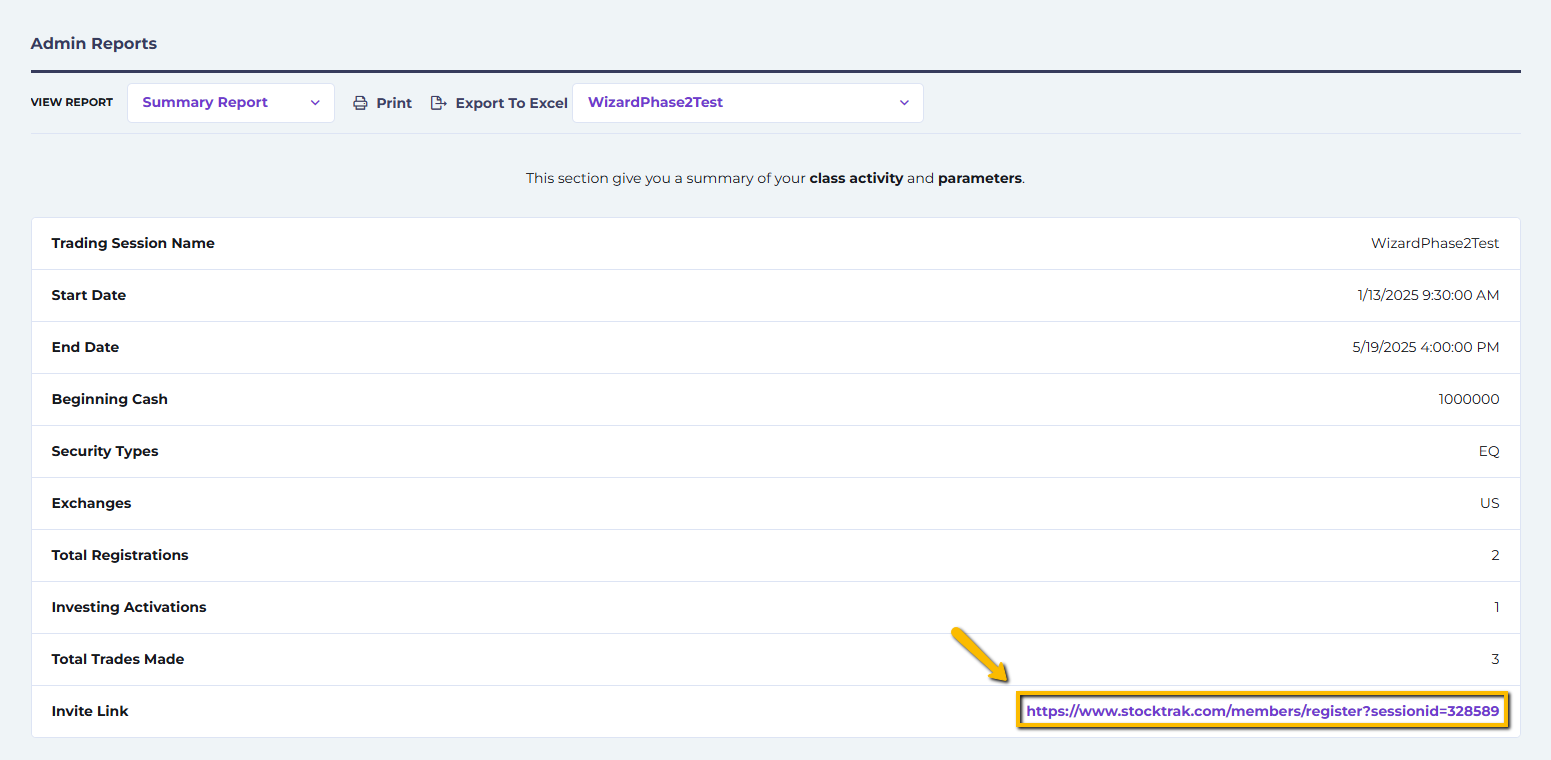
You class registration link is at the bottom of the Summary Report.
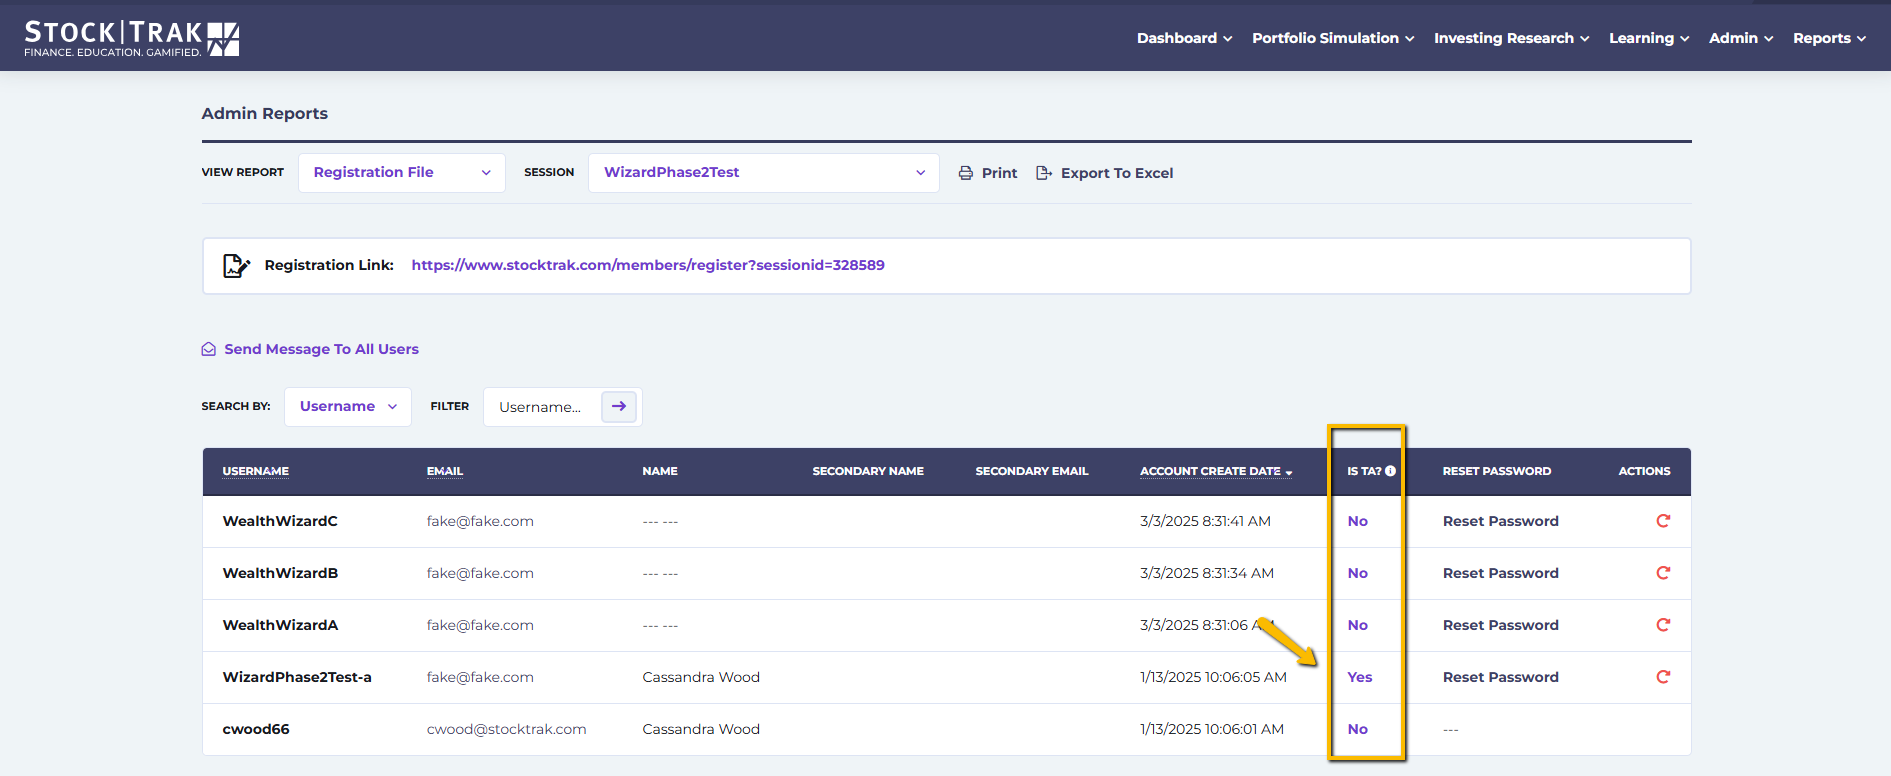
Registration File
The Registration File report will have all the registration information for each student in your class or session. If your students are working in pairs, the name of the second user on each account will also be listed here.
To give your TA the permission to access reports and view student activity, change the answer to Yes under the Is TA? column. TA Accounts are NOT able to edit class settings.
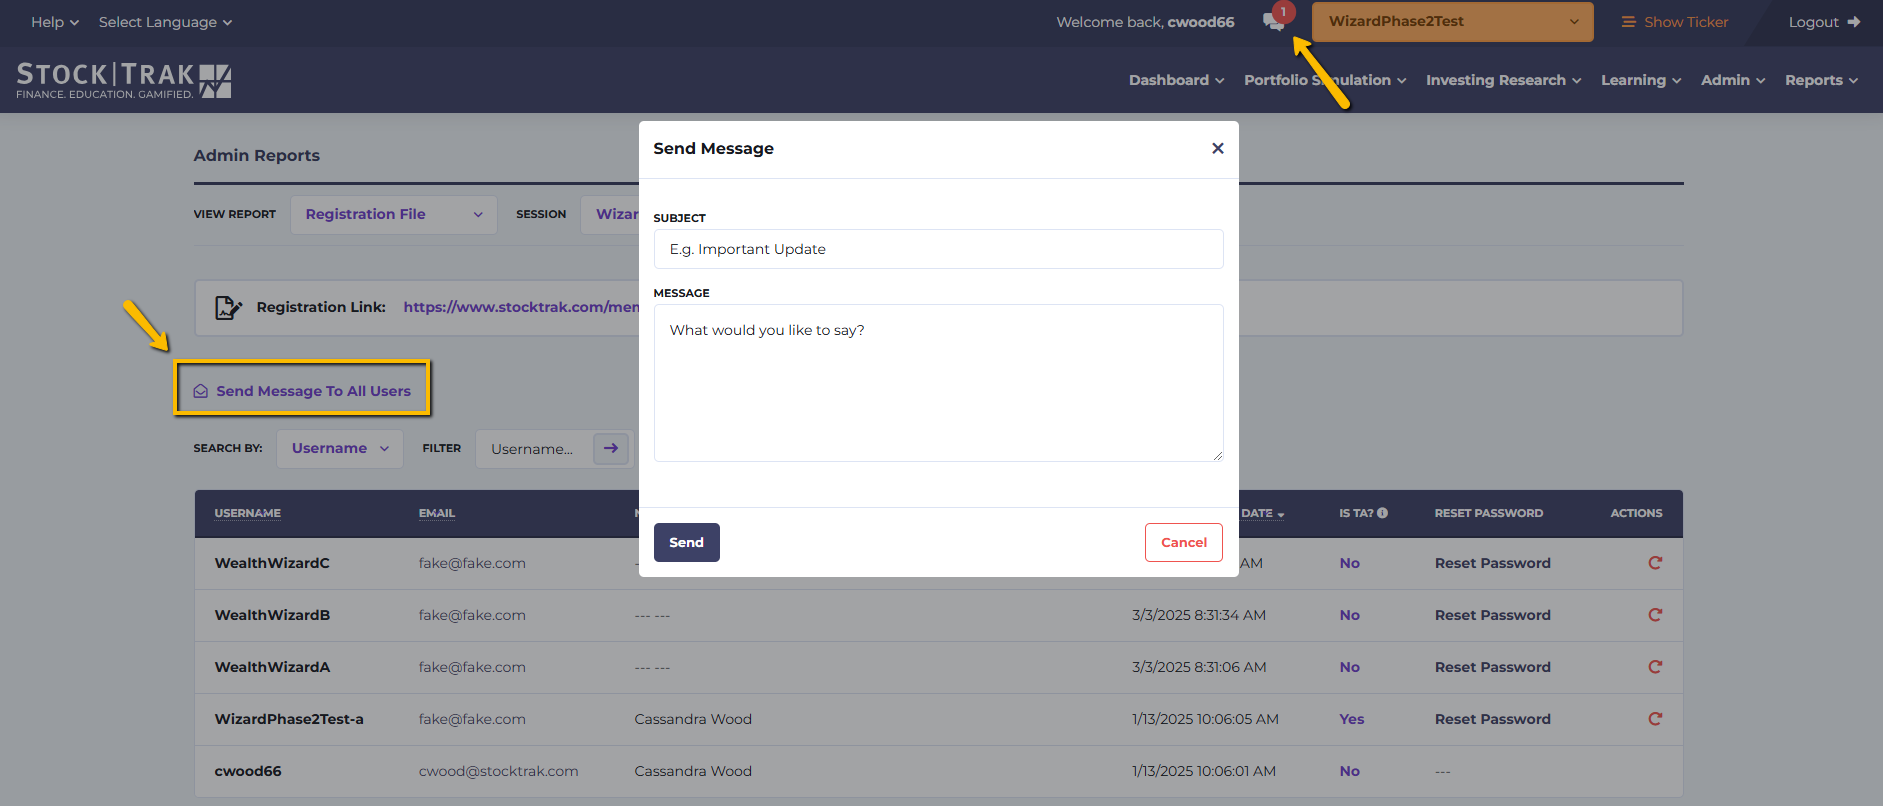
From this page you can also reset passwords, remove student accounts or send a message to all the students (users) in your class or session.
Send Message to All Users
- Click Send Message to All Users and a window will pop-up.
- Add the Subject and Message and click Send.
- All students in your class will receive a notification in their onsite inbox that they received a message from you.
Ranking Report
The rankings report includes portfolio value information for each student. This report updates at midnight each day – if you want to see the intraday rankings, click Portfolio Ranking from the Portfolio Simulation tab on the main menu.
From the Ranking Report, you can:
- Portfolio: click this button to view account details like open positions, transactions, detailed balances, realized profit/loss and trade notes per student.
- Cash Adjustment: will let you add or remove cash from each student’s account.
- View Chart: will provide a pop-up window with a 1-month graph or a 3-month graph of that student’s portfolio compared to the SPY%.
- Reset Portfolio: should be used sparingly as it will purge your student’s account of all their transactions so far.
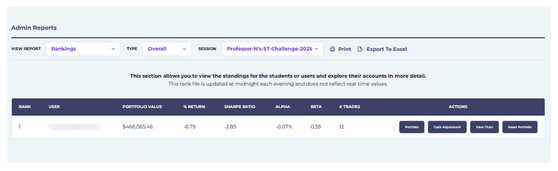
The Ranking Report is updated at midnight each evening, so it does not reflect real-time values.
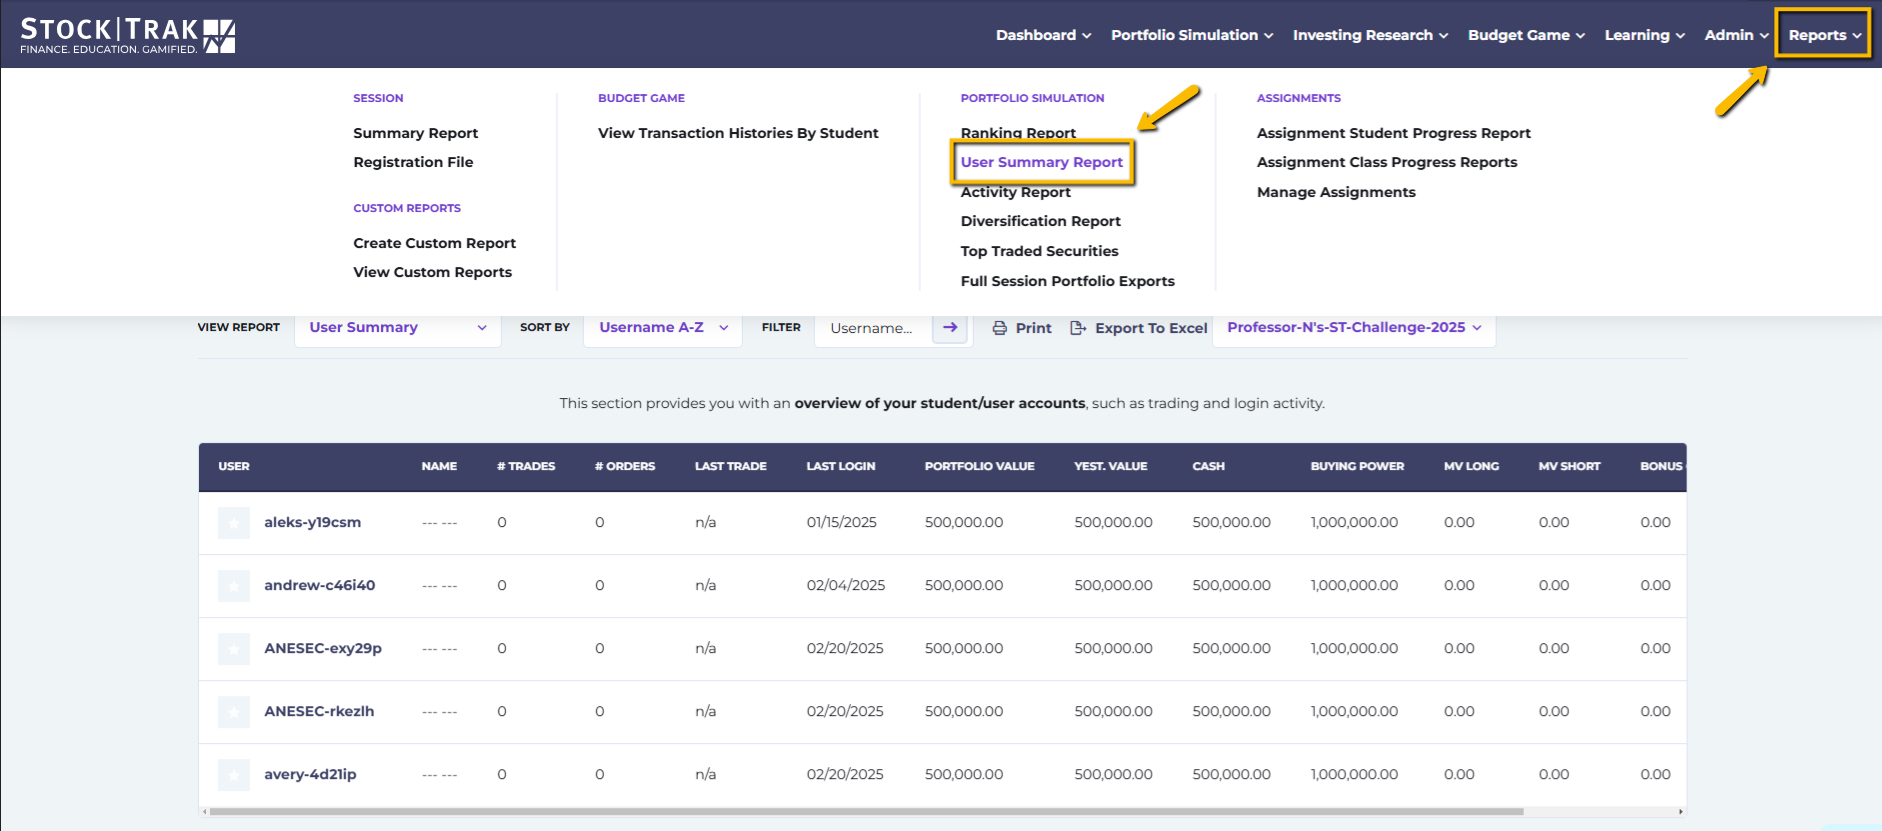
User Summary Report
The User Summary report will contain more granular information for each student’s portfolio. Including:
- Number of trades
- Last Trade
- Portfolio Value
- Yesterday Value
- Cash Balance
- Buying Power
- Market Value Long
- Market Value Short
- Bonus Cash
- Action: View Account Details
- Action: Cash Adjustment
- Action: View Chart
- Action: Reset Portfolio
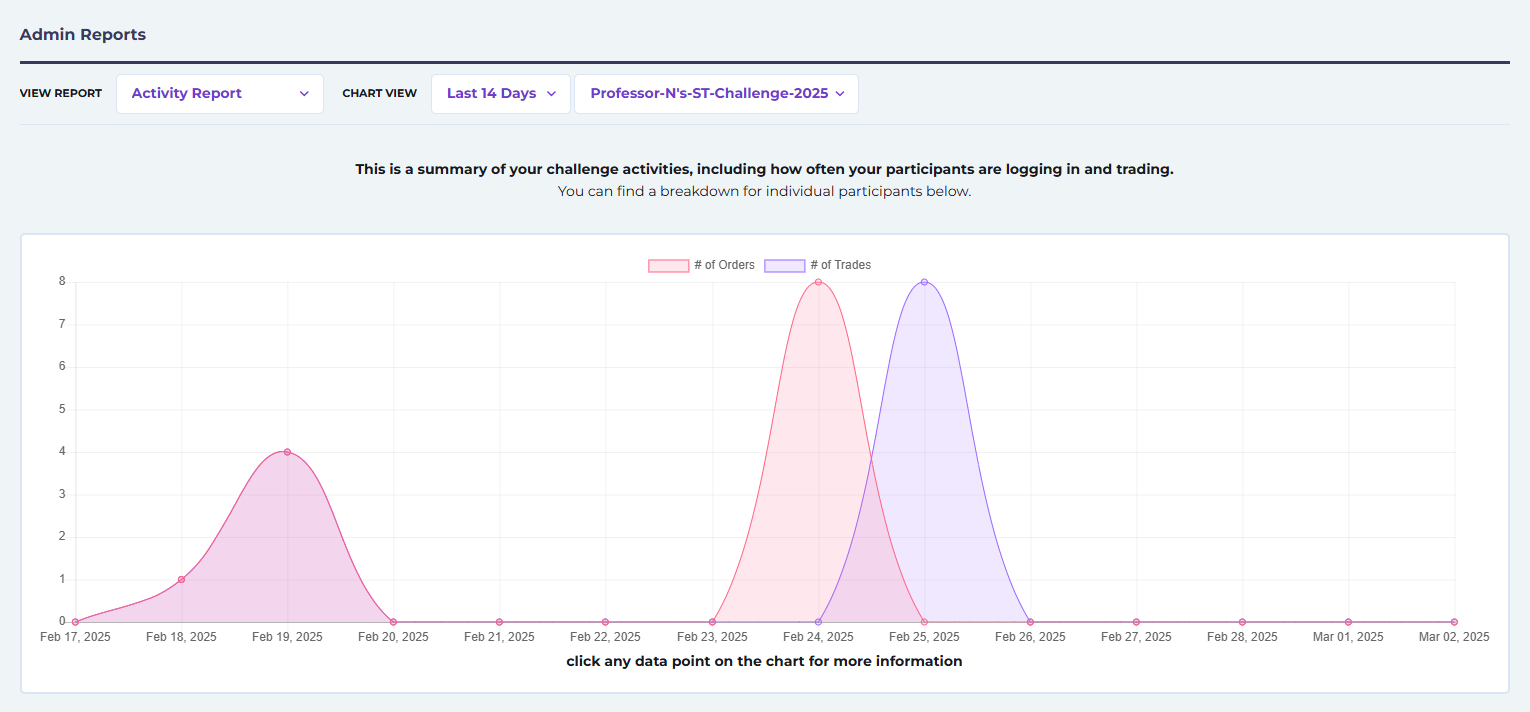
Activity Report
This report will graph the number of trades and number of orders over a 7-day, 14-day or 30-day period.
You will also be able to view more detailed activity per student along with recent orders and their symbols by scrolled down the page.
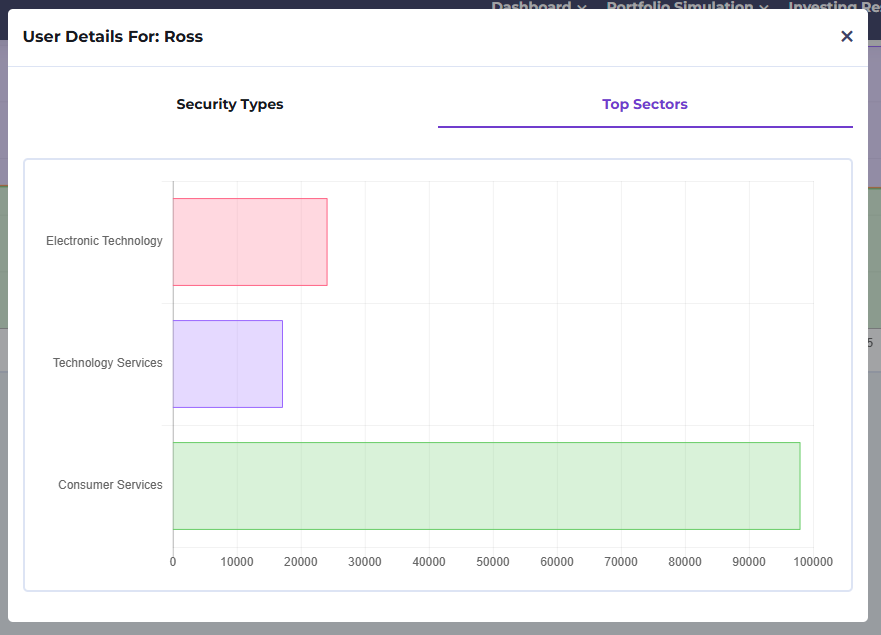
Diversification Report
Find out the breakdown of investments across the different types of securities over the last 7 days, 14 days or 30 days, displayed as bar graphs.
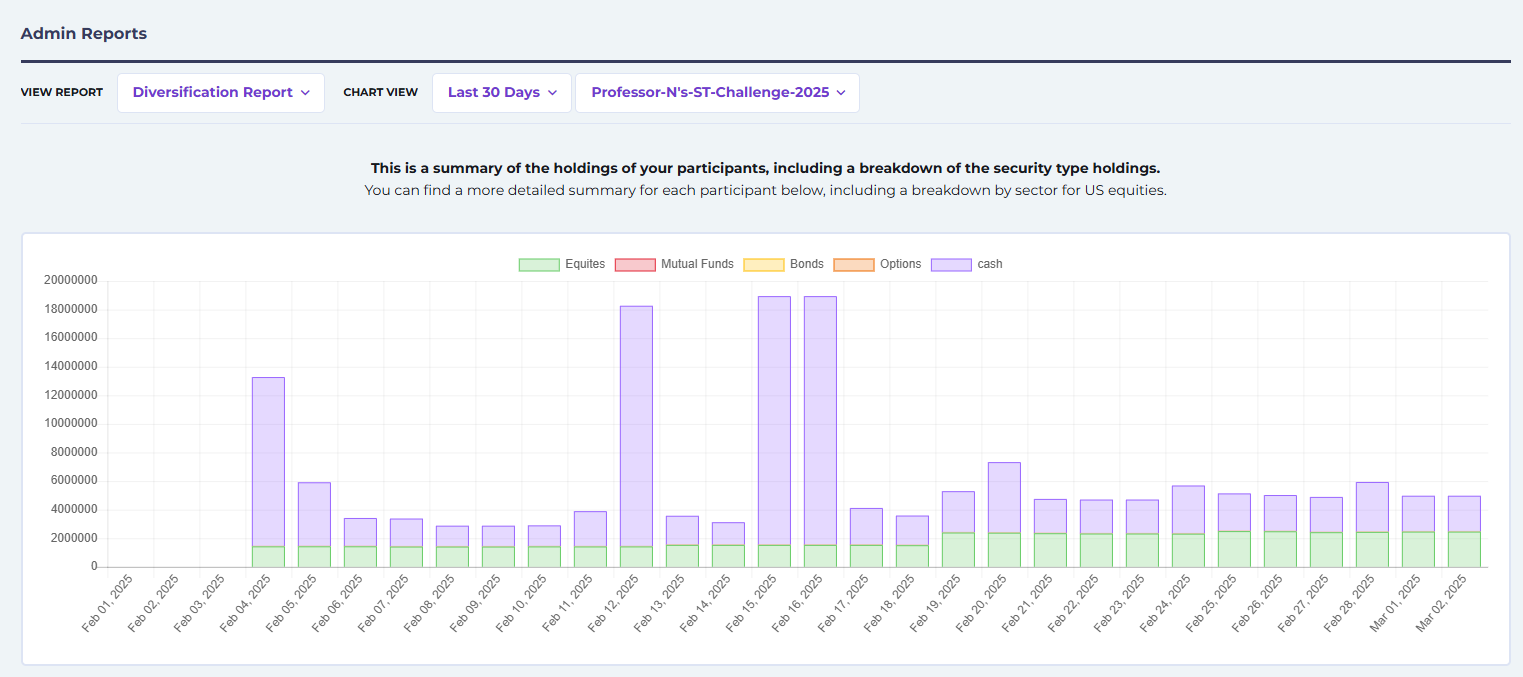
Below this report, you can see detailed information per student in your class. Click the eye icon to see more details about each student’s diversification per security type or sector.
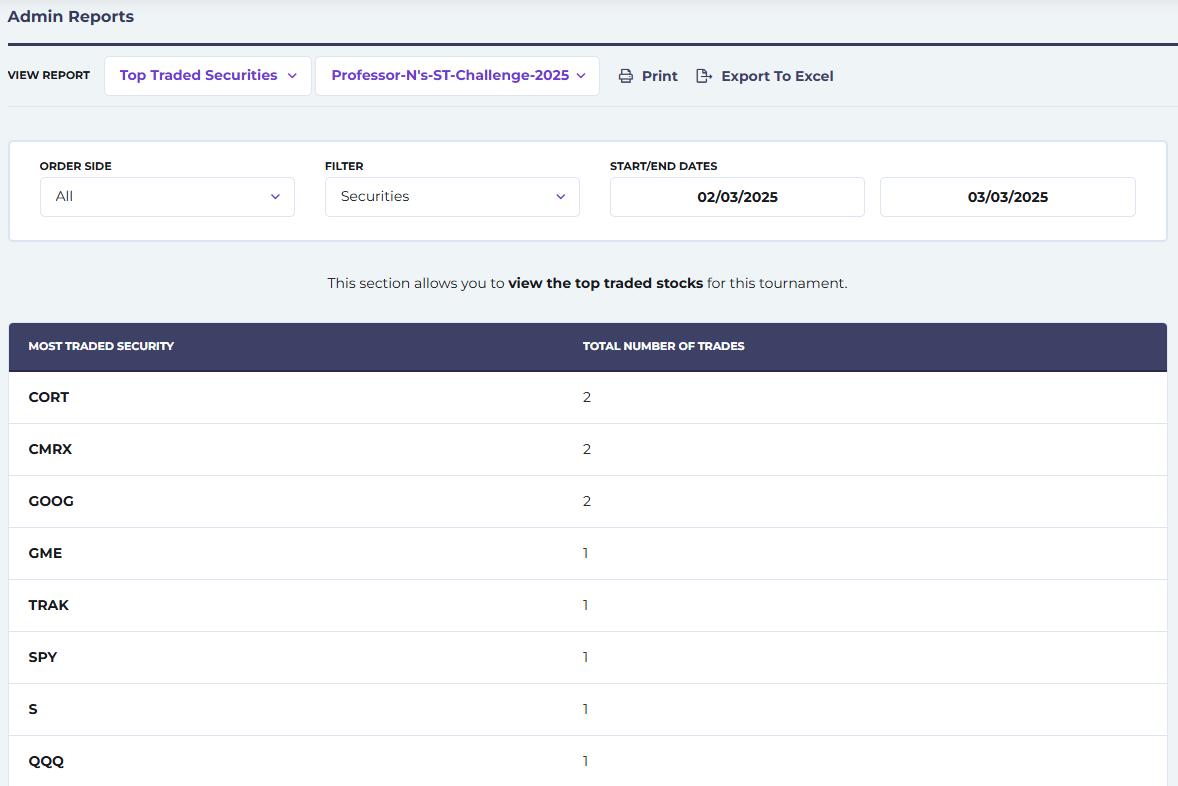
Top Traded Securities
You can filter the most commonly traded securities in your class by date, type of order (buy, sell, short, cover) or by user.
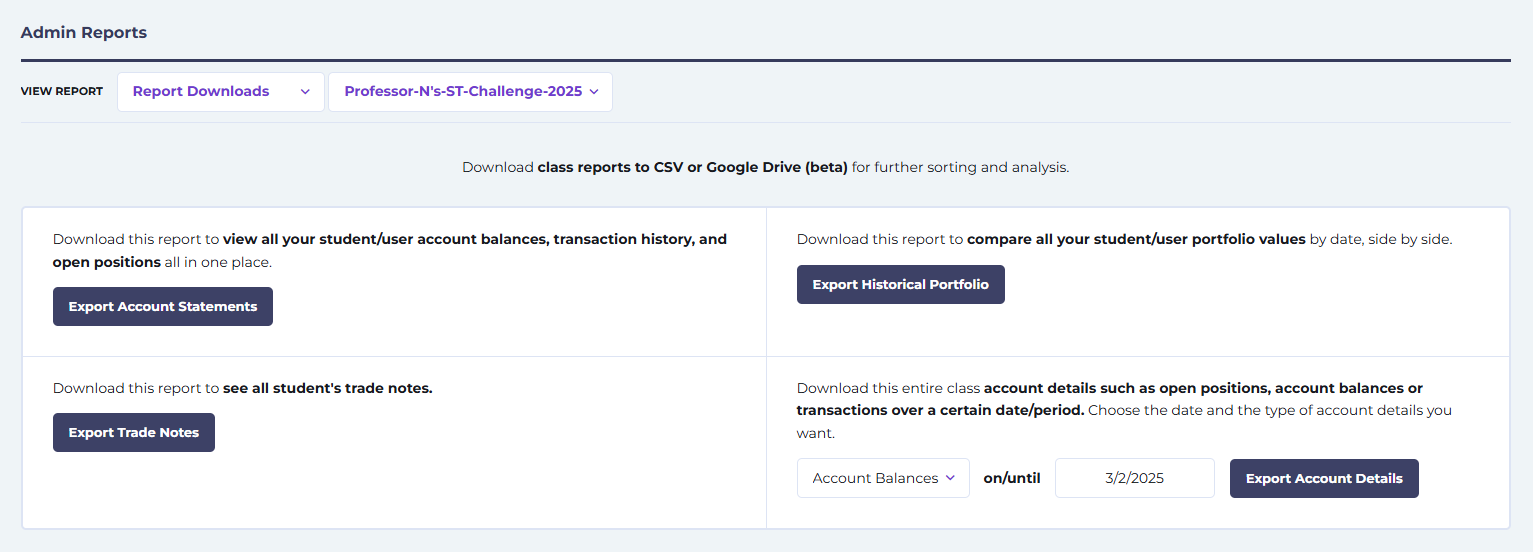
Full Session Portfolio Exports
The report contains larger Excel files that you can export for all students registered in your session.
- Export Account Statements button will download your entire class transaction history, open positions, and account balances, grouped by students.
- Export Historical Portfolio Values will download the end of day value for each student in your class for the entire duration of the trading period.
- Export Trade Notes to download a record of all student trade notes.
- Export Account Details will let you download a subset of the “Account Statements” report, such as just transaction histories or just open positions.
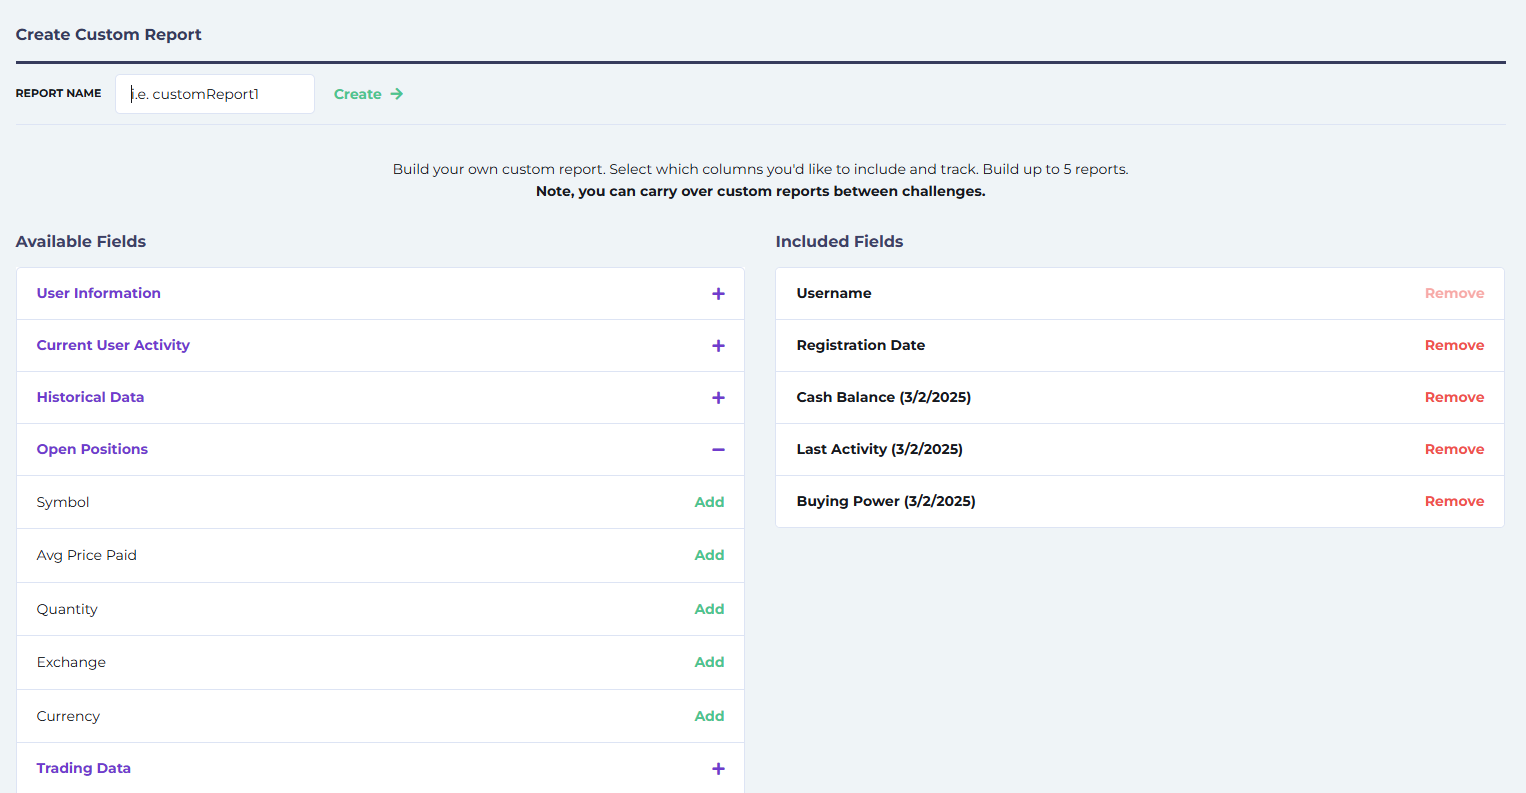
Custom Reports
If you haven’t been able to find the information you’re looking for, you can generate your own Custom Reports. To create one, click Create Custom Report from the Reports dropdown menu. Your report can be as simple or as robust as you need.
Choose from the following items by clicking on Add and your list should automatically populate in the Included Fields column. Whenever you’re done give your new report a name and click Create.
- User Info: first name, last name, email, registration date, secondary name etc.
- Current User Activity: last login date, buying power, trades made, interest charged on cash, market value etc.
- Historical Data: specify the date for when you’d like to see student data for items like, cash balance, market value long, market value short, sharpe ratio etc.
- Open Positions: symbol, average price paid, quantity, exchange, currency
- Trading Data: order side, order status, order type, symbol, quantity, create date, trades notes, security type etc.
- Functions: edit username, reset password, view portfolio, add/remove cash


Need a Helping Hand?
We hope this guide has provided you with a clear understanding of how to edit your class settings and access reports on StockTrak. If you have questions about trading settings, how to access specific information in your reports, or any other aspect of the platform, we have resources ready to assist you.
Get Answers Quickly:
Check our Professor FAQStill Need Assistance?
Phone Number: 1-514-871-2222 (9:00 AM – 5:00 PM EST)
Toll Free: 1-800-786-8725
Email: support@stocktrak.com